Shoulder Pain Self Management
Have you or someone you know been dealing with pesky shoulder pain that won’t resolve on its own?
Often times, this can be contributed to subacromial pain syndrome, a diagnosis we often treat. You may have heard it referenced more commonly as subacromial (or shoulder) impingement. While there are structures in the shoulder region that can be impinged, it is rare that this is truly what’s going on.
There’s a lot going on in the shoulder joint, think of it as a busy road, similar to Route 7 in front of our office. In general, the bones involved in the joint are; the humerus (your arm), the scapula (your shoulder blade), and the clavicle (your collar bone). In terms of muscles, there are over 15 muscles that have an influence on the shoulder girdle, that’s a lot of traffic to direct! Alongside the muscles and bones of the shoulder, there are ligaments as well. (And don’t even get me started about the nerves that travel through the area, we’ll save that one for another post). All these muscles must coordinate with each other in order to move the shoulder throughout a normal and pain free range. If one activates too early or too late, BOOM, an accident can occur, and the rest of the drivers on the road are upset (AKA in pain) until it’s resolved.
Unfortunately, it can take a little longer than a tow truck moving the vehicles out of the way for the problem to get resolved. There are a variety of injuries that can happen to the shoulder, there can be muscle strains, ligament sprains, damage to the joint itself, poor motor coordination of the region (shoulder muscles activating at the wrong time), shoulder impingements as previously mentioned, etc.
Fortunately, as physical therapists, we are well versed in diagnostic tests that can help us to determine what is going on in the shoulder. We’ll provide you with a test you can try on your own to work on your problem-solving skills, and we’ll even throw in a few exercises you can try out to address your problem.
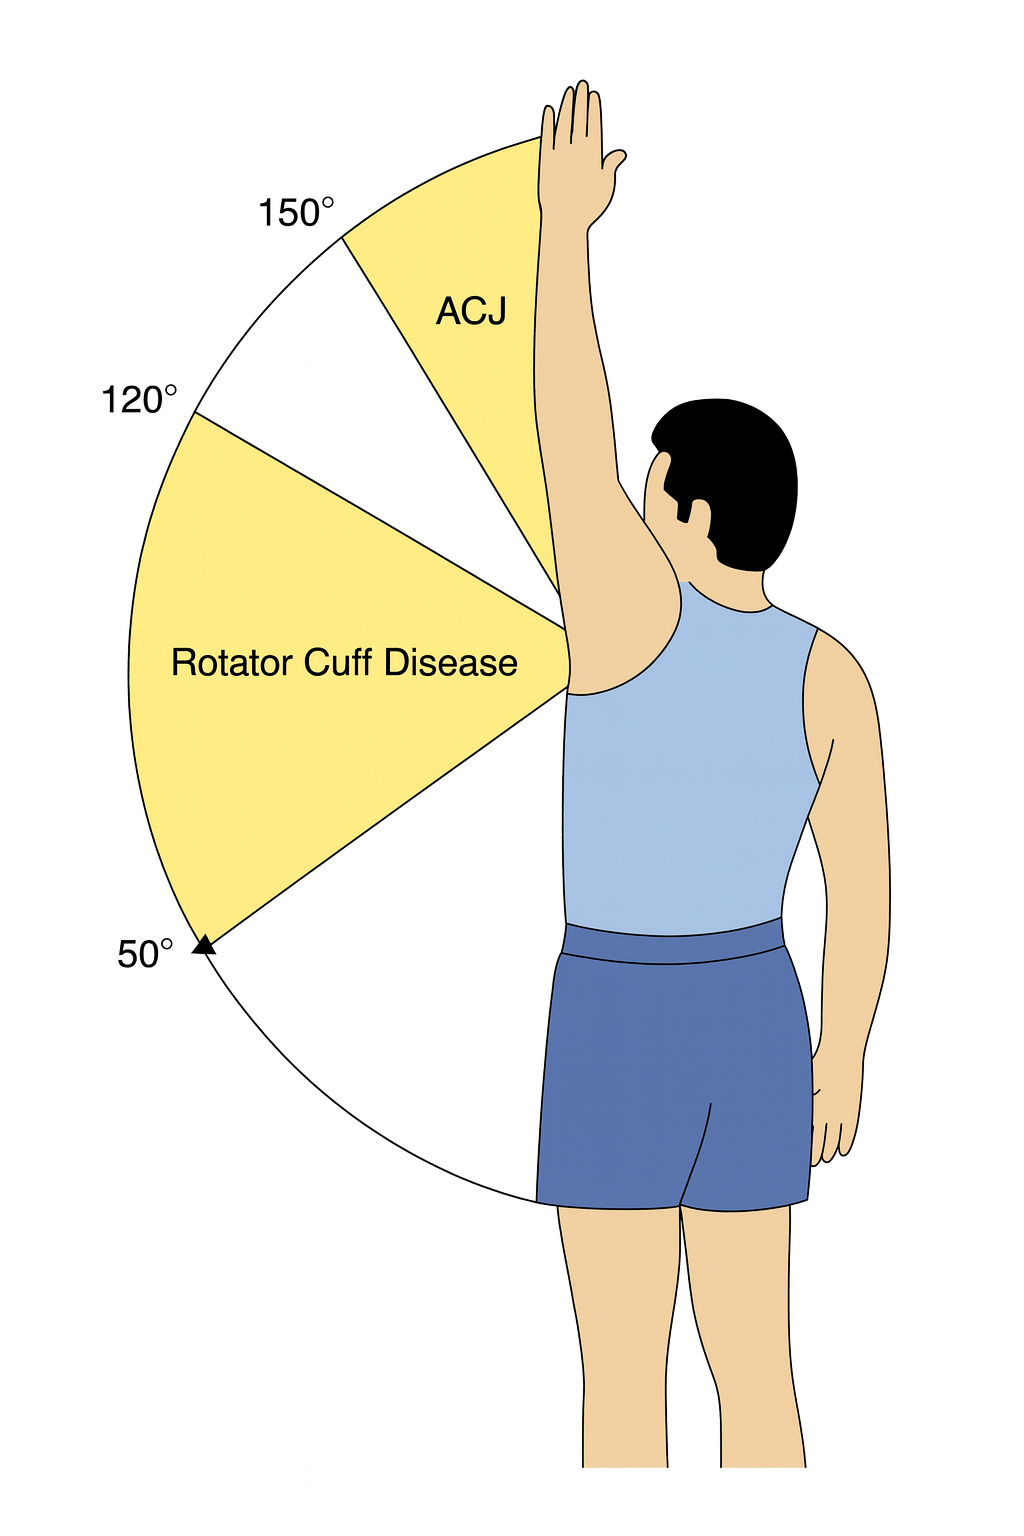
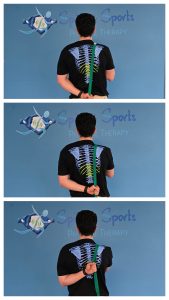
The test in reference is called the painful arc test. It gives you a broad idea of if your shoulder pain is coming from a muscular disorder, or a joint disorder. Check out the image to the right, it is actually quite simple. You place your arm by your side, have your palm facing forward, and raise your arm up towards your head while keeping your arm in line with your body. If you have shoulder pain in the middle portion of the range of motion, you are likely to have some sort of muscular dysfunction in your rotator cuff. If there is shoulder pain at the top of the range of motion, you are likely to have some dysfunction in the joint where your shoulder blade meets your collar bone, this is called the acromioclavicular joint.
https://www.google.com/url?sa=i&url=https%3A%2F%2Fgbu-taganskij.ru%2F%3Fw%3Dillustration-showing-shoulder-impingement-syndrome-painful-arc-stock-photo-kk-D2x32lSk&psig= AOvVaw2zoZ8hU_qxgLWuJgrzX6ul&ust=173022 7662709000&source =images&cd=vfe&opi=89978449&ved =0CBQQjRxqFwoTCIjE57ves YkDFQAAAAAdAAAAABAw
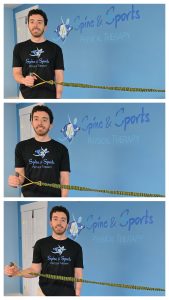
If there is pain in the mid-range, some light exercises you can start with involve bands or light weights. If you have access to bands, attach one side of the band to a stable surface, turn your body so the band is on your non-injured side, keep your arm down by your side (bonus points if you place a towel between your arm and side of your body), bend your elbow to 90 degrees, grab hold of the resistance band and rotate your forearm away from your body, we call this, “Resisted shoulder external rotation”. If you don’t have resistance bands, don’t fret! Grab a can of soup, a water bottle or other light weigh object lying around the house. Find your nearest couch or bed, get into a side lying position on your uninvolved side, bend your elbow to 90 degrees, keep your arm by your side, rotate your wrist and forearm away from your body while holding the can of soup! This mimics the same motion as the band, just a modified version, since not everyone has resistance bands!
Then, facing the other direction (so your injured side is closer to the band), perform the same set-up, this time rotate your forearm towards your body, this is called, “Resisted shoulder internal rotation”. Perform several sets of 10-15 reps for each exercise.
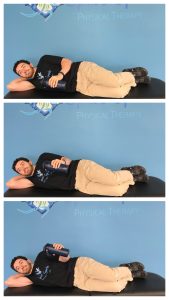
Next, to stretch some of the muscles in the region that may be tight, we are going to ask you to perform a behind the back stretch. First get a belt, towel, or yoga strap if you have one. Place your injured arm behind your back with your palm facing away from you (as if you are tucking in your shirt behind your back), then hold your belt, towel, or yoga strap in your uninjured arm and bring that above and behind your head. While grabbing the bottom of your item of choice with your injured arm, use your uninjured arm to pull up and stretch some of the muscles of injured, shoulder girdle.
This exercise is typically referred to as the, “Shoulder internal rotation towel stretch”. This stretch should be held for around 30 seconds for 3-4 sets. It should be minimally to moderately uncomfortable, but it shouldn’t be painful.
Finally, if there is pain at the top of the range of motion, all you need to start with is your body, and a wall, or a kitchen countertop! The first step is to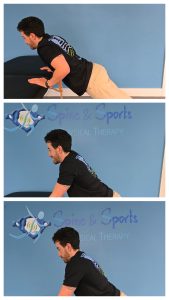 set up in a push up position facing the wall or countertop of your choice (making sure that you are using an immovable surface), make sure you are two-three steps away from the surface you are using, then perform a push up! The key here that separates this exercise from a regular push up is trying to separate your shoulder blades as far as possible at the end portion of the movement. The purpose of this exercise is to encourage mobility at that joint where the shoulder blade and collar bone meet. This exercise is a modified version of what people typically call the, “Push up plus”.
A good rule of thumb is any exercise that causes your pain to increase as you continually perform more reps is something you shouldn’t be doing at that time. An exercise that doesn’t change your pain as you perform is okay to do, and any exercise that decreases your pain as you perform is something that you should be doing often. Perform these stretches and exercises for your painful shoulder 3-4 times per week to start, then begin to advance as you are comfortable.
This is just the tip of the iceberg in terms of managing shoulder pain or discomfort. The diagnostic tests and exercises we provided are not meant to cover every condition, and are not meant to replace the opinion of a license professional. We hope this has helped to provide you some insight into managing your shoulder condition. If you have any questions, feel free to leave a question in the comments. Give these a shot for a few weeks and see how your symptoms improve!
If you don’t see a change or plateau, give us a call to schedule an evaluation as there is likely some other stuff going on that we will have to further evaluate and get to the bottom of. Hopefully this helps resolve your symptoms and you don’t have to come in to see us, but if you do we look forward to meeting you, helping you get rid of your shoulder pain, and getting back to doing the things you love!
Written by Dr. David Costa, PT, DPT
Hi All!
Great images Dave.
This is Susan, your Brookfield neighbor. Dave, I may be emailing you soon.
Have a blessed Christmas!